Tuesday, December 4, 2018
Easy Handmade Christmas Card Tutorials
I like playing around with scrapbook paper to make collages and cards, but I don't do enough of it (yet) to invest in a die cut or other special equipment that a lot of scrapbook tutorials require. So this year when I decided to make my own Christmas cards, I thought up some easy designs that I could make with just a pair of scissors and some glue sticks.
I created four different designs, each with multiple variations. So far, I've made 16 cards. If you're interested in seeing more, I have photos and links to the tutorials below. Each tutorial includes any templates or stencils that you might need to make your own cards.
First, my Reindeer with holiday branches and berries card.
Next, one of my favorites - my Poinsettia card. I made a bunch of these cards by changing up the colors that I used for the flower.
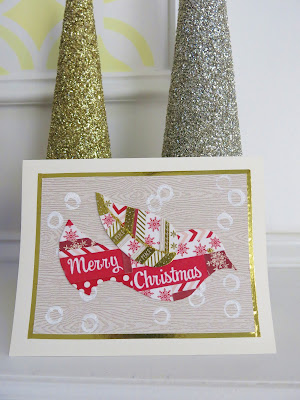
My Patchwork Dove card - this is made with strips of scrapbook paper and washi tape.
And my Quilt-Inspired Christmas Tree. I hope these cards inspired you to try making your own cards this year!
Sunday, April 8, 2018
Easy Journal Makeover Project
Hi all! I know I've not been posting for a while, but honestly - I didn't have much to share. But this is a quick, easy project that I thought might be of some interest.
I've done journal transformations before, but for this book I wanted to do something quick and super easy. My mom found this unused notebook/journal (above) at a book sale and asked if I wanted it. I didn't love the cover, but the book was in good shape and seemed like an empty canvas. I decided to do a simple acrylic paint design of transform the cover (Unfortunately, I picked a rainy day to do it. So my photos are a little dark).
1. The first thing I did was put a piece of wax paper between the front cover and the pages of the notebook. This would keep the pages clean if I spilt any paint.
2. Next, I used a broad brush to paint the front cover a light blue that was similar to the actual cover. I used acrylic paint for this.
3. Once my paint was dried, I divided the cover into 9 equal squares. My cover is not exactly square, so each box is slightly rectangular, but I didn't care.
4. Then I painted the interior of each square with a light cream color.
5. When my cream paint was dry, I used a thin brush and a dark blue-purple paint color to sketch a circle into each box. These circles were not perfect and each was slightly different.
6. Next, I switched to a slightly wider brush and added more color to each circle. I built up the color using purple, green, and blue with loose brush strokes to create a different painterly circle in each box. I worked quickly so in some places, my colors were able to blend together before the paint dried.
7. Then I started to add some lighter, brighter colors to each circle.
8. When I was happy with the overall look of my circles, I let my paint dry completely.
9. As a last step, I added a few sweeps of metallic gold paint to each circle. The metallic gold is hard to photograph but I like how it lightens up my design.
I'm excited to fill my new journal with some new project ideas!
Subscribe to:
Comments (Atom)


